Creating ROS 2 Actions
 Esther Weon ·
There are several different ways that ROS 2 nodes can share information with each other. They can publish an ongoing stream of data via topics, or initiate one-off requests via services.
Actions are a final way for ROS nodes to communicate with each other. They combine the best of both worlds, using both open-ended data streams and discrete requests to execute long-running tasks.
In this tutorial, we’ll discuss how ROS actions work, when to use them, and how to implement a simple action client and server in Python.
How do ROS 2 actions work?
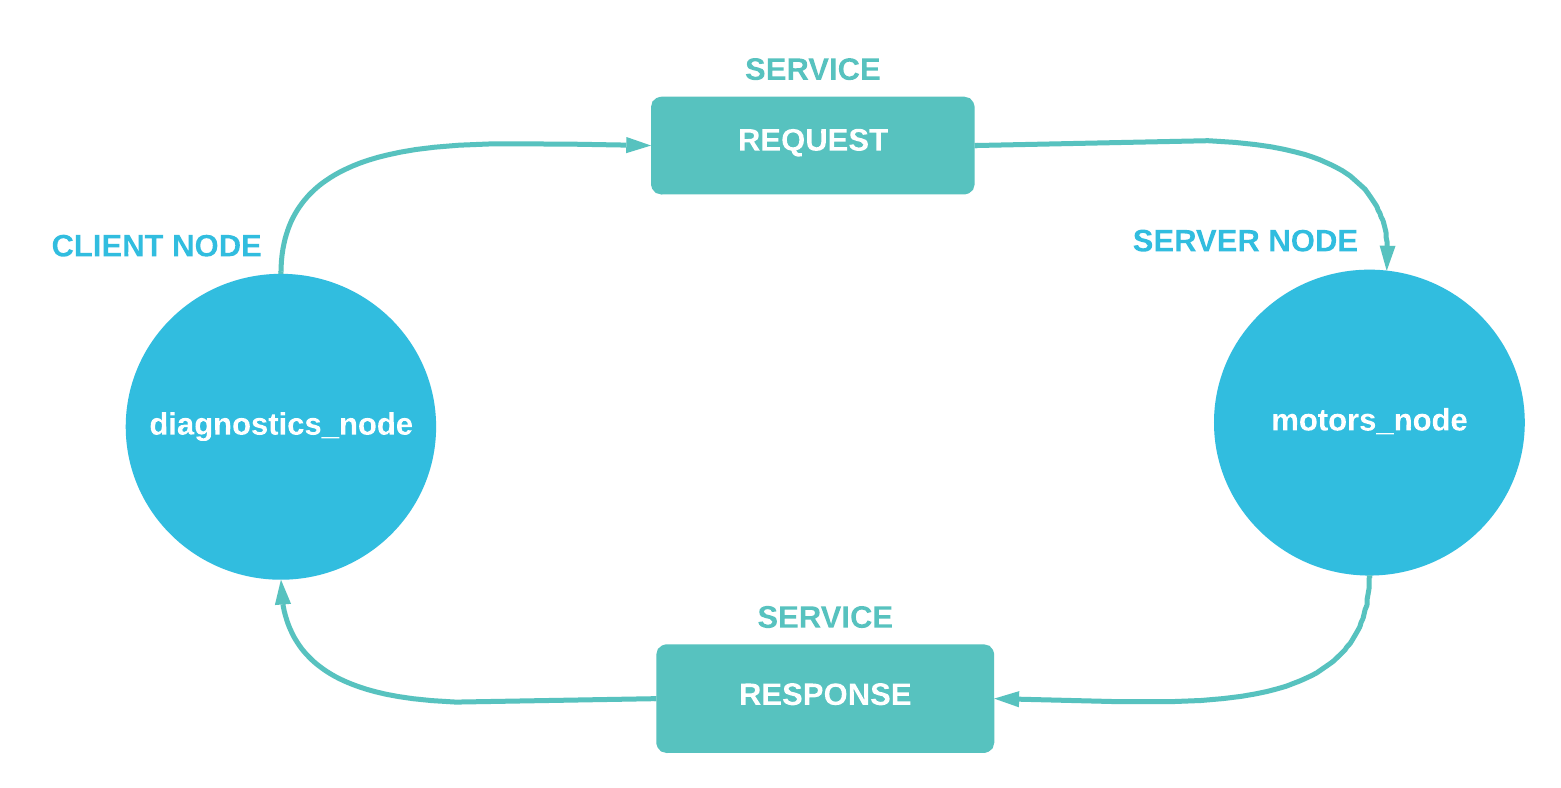
With topics, nodes follow a publisher-subscriber model – a node publishes messages on a topic, while other nodes subscribe to that topic. Services, on the other hand, follow a request-response (RPC) model – a client node makes a request to a server node, then waits for an asynchronous response.
Under the hood, ROS actions are built on top of both topics and services. They maintain open-ended streams of communication (like topics) that can be initiated or canceled on request (like services).
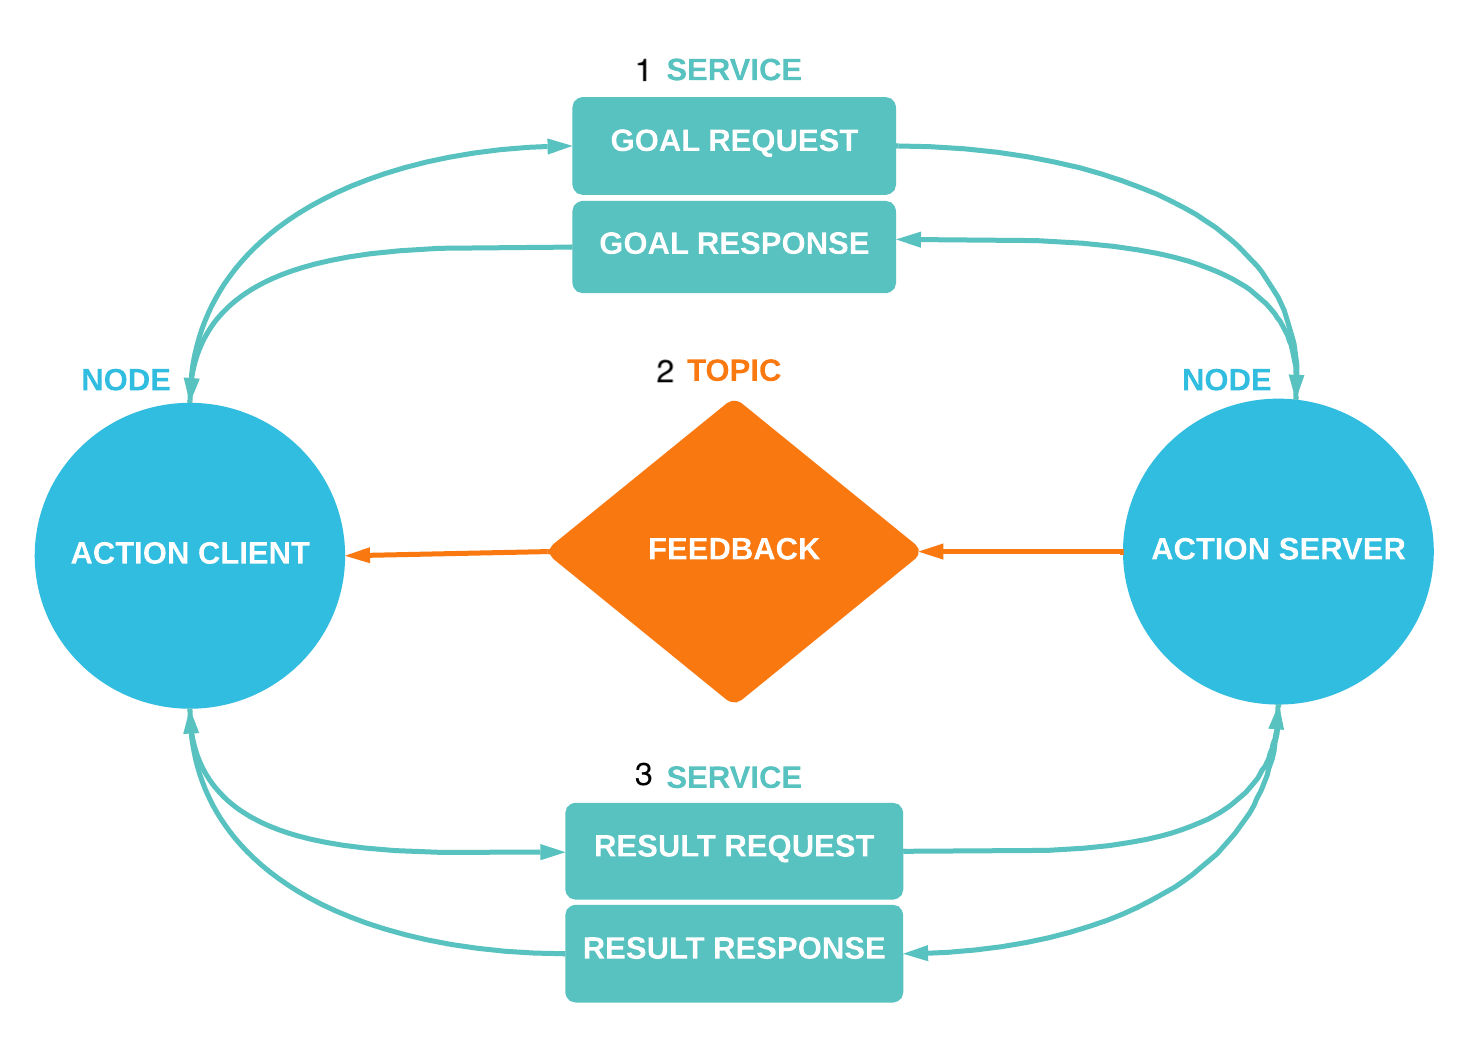
At a high level, a client node initiates an action by sending a goal as a service request to a server node (step 1 in diagram below). Once that server node acknowledges the goal with a service response, it will start publishing feedback, or updates on its progress towards that goal, on a topic (step 2). Meanwhile, the client node makes a second service request for the action’s result (step 3). Once the goal succeeds or fails, the server sends back a service response containing the result.
How can we use ROS 2 actions?
Their three-part architecture – goal, feedback, and result – makes ROS actions especially well-suited for long-running tasks. It’s no surprise, then, that actions are most often used by robots for navigation tasks.
If a fleet operator wanted to send a warehouse AMR to a particular aisle a few minutes away, for example, they can initiate a ROS action with that destination as the goal. While on its journey, the robot could broadcast feedback back to the operator about how far it has traveled along its designated route.
If requirements change, and the operator decides to send the AMR to a different aisle, they have the option to cancel the first action and initiate a new one to reroute the robot to a different destination. Otherwise, if the robot successfully reaches its destination, it sends a final confirmation back to the operator, confirming its arrival.
Defining an action
Now that we know how actions work, and when they can be used, let's write some code!
For this exercise, let's create an action that alerts a warehouse robot when it's time for it to start its shift. The action should start counting down from a given number, broadcast updates as it progresses, then finally announce when it’s reached zero.
Actions are defined in .action files, with 3 sections separated by ---:
# Request
---
# Result
---
# Feedback
In a ROS 2 package, create an action/ directory with a Countdown.action file. Let’s include a starting_num for the countdown in the request, the current_num in the feedback, and confirmation that the countdown is_finished in the result:
# Request
int32 starting_num
---
# Result
bool is_finished
---
# Feedback
int32 current_num
Before we can use this action, we have to pass the definition to the rosidl code generation pipeline. Add the following lines to your CMakeLists.txt file, before the ament_package() line:
find_package(rosidl_default_generators REQUIRED)

rosidl_generate_interfaces(${PROJECT_NAME}
  "action/Countdown.action"
)
We should also add the required dependencies to our package.xml:
<buildtool_depend>rosidl_default_generators</buildtool_depend>

<depend>action_msgs</depend>

<member_of_group>rosidl_interface_packages</member_of_group>
You can now navigate to the root of your package, and build it with your action definition:
$ colcon build
Source your workspace, then check that the action built successfully:
$ . install/setup.bash # On Windows: $ call install/setup.bat
$ ros2 interface show my_ros2_package/action/Countdown
Writing an action server
Let’s write an action server that counts down from our Countdown action request’s starting_num.
Create a countdown_server.py file in your package and import the following packages:
import rclpy
from rclpy.action import ActionServer
from rclpy.node import Node

from my_ros2_package.action import Countdown
Create a CountdownServer class as a subclass of the Node class, which will be initialized as a node named "countdown_server". Then, create an action server that specifies the node for the action client to attach to (self), the action type (Countdown), the action name ("countdown"), and a callback function for handling goals from the client (execute_callback):
class CountdownServer(Node):
    def __init__(self):
        super().__init__("countdown_server")
        self._action_server = ActionServer(
            self,
            Countdown,
            "countdown",
            self.execute_callback)
Next, define the execute_callback function as one that logs a helpful message ("Starting countdown…"), indicates that the goal succeeded, and then returns a result:
    # Callback function to run after acknowledging a goal from the client
    def execute_callback(self, goal_handle):
        self.get_logger().info("Starting countdown…") \

        # Indicate that the goal was successful
        goal_handle.succeed()
        result = Countdown.Result()
        return result
Finally, let’s spin up an instance of this CountdownServer class:
def main(args=None):
    rclpy.init(args=args)
    countdown_server = CountdownServer()
    rclpy.spin(countdown_server)

if __name__ == '__main__':
    main()
In a Terminal window, run your action server:
$ python3 countdown_server.py
In another window, use ros2 action to send a goal:
$ ros2 action send_goal countdown my_ros2_package/action/Countdown "{starting_num: 5}"
In the first window, you should see "Starting countdown…", followed by the status SUCCEEDED.
Now that we’ve verified our server is running, let’s actually count down from our goal’s starting_num:
import time

# other imports

class CountdownServer(Node):
    # other methods

    def execute_callback(self, goal_handle):
        self.get_logger().info("Starting countdown…")

        feedback_msg = Countdown.Feedback()

        # Initiate the feedback message’s current_num as the action request’s starting_num
        feedback_msg.current_num = goal_handle.request.starting_num

        while feedback_msg.current_num > 0:
	        # Decrement the feedback message’s current_num
            feedback_msg.current_num = feedback_msg.current_num - 1

           # Print log messages
            self.get_logger().info('Feedback: {0}'.format(feedback_msg.current_num))
            goal_handle.publish_feedback(feedback_msg)

	        # Wait a second before counting down to the next number
            time.sleep(1)

        goal_handle.succeed()
        result = Countdown.Result()
        result.is_finished = true
        return result
If you restart the action server and send another goal using the --feedback flag, you’ll now see a printout of the feedback logs and the goal result (true).
$ ros2 action send_goal --feedback countdown my_ros2_package/action/Countdown "{starting_num: 10}"
Writing an action client
Now that we have a server working, let’s write the client that will initiate the request to your server.
Create a new countdown_client.py file, and import the following packages:
import rclpy
from rclpy.action import ActionClient
from rclpy.node import Node

from my_ros2_package.action import Countdown
Once again, we create a class (CountdownClient ) as a subclass of the Node class, which will be initialized as a node named "countdown_client". It should contain an action client that specifies the node for the client to attach to (self), the action type (Countdown), and the action name ("countdown"):
class CountdownClient(Node):
    def __init__(self):
        # Initializes "countdown_client" node
        super().__init__("countdown_client")
        self._action_client = ActionClient(self, Countdown, "countdown")
As we discussed, the primary function of a client is to send a goal to the server:
    # Waits for server to be available, then sends goal
    def send_goal(self, starting_num):
        goal_msg = Countdown.Goal()
        goal_msg.starting_num = starting_num
        self._action_client.wait_for_server()

        # Returns future to goal handle; client runs feedback_callback after sending the goal
        self._send_goal_future = self._action_client.send_goal_async(goal_msg, feedback_callback=self.feedback_callback)

        # Register a callback for when future is complete (i.e. server accepts or rejects goal request)
        self._send_goal_future.add_done_callback(self.goal_response_callback)

    # Run when client sends goal
    def feedback_callback(self, feedback_msg):
        feedback = feedback_msg.feedback
        self.get_logger().info('Received feedback: {0}'.format(feedback.current_num))
Once the goal is acknowledged by the server, we want to be able to access whether it was accepted and whether it reached a successful result:
    def goal_response_callback(self, future):
        # Get handle for the goal we just sent
        goal_handle = future.result()

        # Return early if goal is rejected
        if not goal_handle.accepted:
            self.get_logger().info('Goal rejected :(')
            return

        self.get_logger().info('Goal accepted :)')

        # Use goal handle to request the result
        self._get_result_future = goal_handle.get_result_async()
        self._get_result_future.add_done_callback(self.get_result_callback)

    def get_result_callback(self, future):
        result = future.result().result

        # Log result and shut down ROS 2 cleanly
        self.get_logger().info('Result: {0}'.format(result.is_finished))
        rclpy.shutdown()
Finally, initialize ROS and spin up the client node:
def main(args=None):
    rclpy.init(args=args)
    action_client = CountdownClient()

    # Sends goal and waits until it’s completed
    future = action_client.send_goal(10)
    rclpy.spin(action_client, future)

if __name__ == '__main__':
    main()
In separate Terminal windows, run your action server and action client:
$ python3 countdown_server.py

$ python3 countdown_client.py
In the server window, you should see feedback messages printing as the server executes the goal:
[INFO] [countdown_server]: Starting countdown...
[INFO] [countdown_server]: Feedback: 10)
[INFO] [countdown_server]: Feedback: 9)
[INFO] [countdown_server]: Feedback: 8)
[INFO] [countdown_server]: Feedback: 7)
In the client window, you should see messages about the goal’s status, the ongoing feedback, and eventually the final result.
You've created your first working ROS action client and server!
Summary
By leveraging the strengths of both topics and services, ROS 2 actions are able to set goals, make progress on those goals, and broadcast when they’ve succeeded.
We hope this tutorial helped you get a better understanding of how you might use ROS actions in the larger scheme of your robot’s architecture. For a reference to all the code covered in this post, check out our foxglove/tutorials GitHub repo.
As always, feel free to reach out to the Foxglove team in our Slack community to ask questions, give us feedback, and request a topic for the next tutorial!
Read more:
Make discrete requests between ROS nodes for one-off tasks
 José L. MillánJosé L. Millán
Make discrete requests between ROS nodes for one-off tasks
José L. MillánJosé L. MillánGet blog posts sent directly to your inbox.